Scenario with orders of battle here
I have just finished reading the first volume of Thunder on the Danube, and for motivation and honestly a little bit of change I have thrown together a small scenario for this historical engagement. It's for my own rules and has limited time and space as a priority. We finished the game in about 1,5 hours.
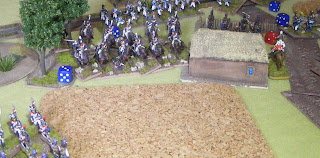
On the picture above, the French had finished deploying, which the Austrians observe with some concern. The Emperor chose to bring forward the heavy cavalry instead of the lights.
The French right, commanded by Lannes, crosses the river, but the Emperor makes a blunder and sends the Bavarian battle cavalry against a fortified position.
On the French left, an overwhelming force is about to fall on the lonely unit of Grenzer nesting in the woods.
The heavy cavalry reserve is committed prematurely, and an Austrian square halts them for three consecutive turns.
The Austrian right is thrown back, and the Hussar reserve is sent to save them. The position batteries are not as effective as expected, but still they are a formidable force.
On the left, the Austrians desperately try not to be cut off from each other. The French artillery starts breaking down the walls of the strong position.
After some pushing back and forward, and being locked in a deadly melee, finally the Austrian infantry yields and Bieber's force is cut off, as well as losing the cover of the walls. They are thrown back by the Bavarian cavalry, but manage to retreat towards the table edge - the Austrians begin slowly extricating their most exhausted forces.
The square in the center is finally ridden down, but the French reserve cavalry does not really exploit it further. The Grenzer still hold Eckmühl at this point, they prove to be a tough opponent for the Bavarian infantry.
However, the Austrian right is in shambles, and a French infantry unit heroically storms the battery. The Austrian gunners panic and the canister is sent flying too high. Luckily for the Austrians, the table edge is near, so the two infantry units previously routed can escape with relatively low casualties. The Hungarian hussars chase a French infantry unit off the field, which is the only major French casualty in the entire battle.
Most of the Austrian units retreat to safety (the reserves do not show up at all), the last to leave is the Grenzer holding the village. They form square, deliver a volley then run the gauntlet successfully between the French troops closing on them.
Austrian losses:
2 infantry units destroyed
4 cannon captured
French losses:
1 infantry unit routed
1 cannon captured
This was a really fun game which could bring out the best from the rules, and although a single unit represented multiple battalions/squadrons, the game worked well at the tactical level too. The French had a better chance to closely support their attacking units with their field guns, while Austrian bombardment failed to procure the desired effect (the Bavarians were somewhat peppered and a French infantry unit routed twice).
The Austrian battle cavalry (supposed to be Chevauxlegers but I could not find them, so they were dragoons instead) was never committed, but there was little chance to do anything useful without getting bogged down and then shot to pieces.
Overall we managed to reproduce the historical result, an important tactical victory for the French, but not a breakthrough or anything of the sort.


Enjoyed your narrative and the pictures - attractive set-up.
ReplyDeleteThank you Sir!
Delete