I don't currently have all materials available, but I will use illustrations made in MS Paint to share my secrets.
As these are gaming pieces, I started more with practice from the pre-dreads than actual knowledge. However, I have a bunch of good books (Hungarian only) and in the age of Google reference material is very easy to acquire.
Tools
Sharp knife (I'm using an ages old Italeri X-acto that came in a set with a sprue cutter and mat)
A fine file (using a metal file for this)
Fine grit sandpaper (using 1000 grit)
PVA and a brush to apply it
Superglue to fix the masts and sails
Materials
Paper
Wooden sticks (any cylindrical one, I'm using kebab sticks. You can get pieces made of pine, various girth, in model shops, but these are not very straight and often have knots.)
Green stuff (for the bow decorations)
Regular paper and card
Balsa wood of the desired thickness (I bought mine at an aircraft model store which has a lot of stuff like this, came in a 10cmx1m size and I've still got most of it left)
Some sort of thread, preferably a dark or neutral color, but it can be painted over for the rigging, and does not matter on the hull.
Match sticks (not really necessary, just for the ease of the process)


Fig 2. This also requires experimenting and a hazy idea of what sort of ship we're building. Marking top or bottom of the rectangle for direction of cuts, we begin to shape the bow and stern, the most curved parts of the hull. The excess is carefully removed with the knife, and then the file comes to action to actually shape things. Illustrated above: we still leave excess for the file to work on, but a large amount is removed by cutting off the edges. This must be done by cutting with and not against the grain (believe me, the latter can cause horrendous results): so if the grain is in the direction of 1., the direction of the cut removing the excess material is 2.

On the picture above, we provide a reach to the inside of the hull, a prominent feature on most ships. This can be done by carefull carving a square hole in the wood, or by simply removing the whole section and then gluing the necessary pieces back (illustrated with the dotted lines). The latter, however, requires some time before we can proceed to the next steps as the glue has to dry.

After this small step is complete, everything is sanded thoroughly with the fine grit paper. The curves are the most problematic, so I suggest going over them multiple times, both with and against the grain. When finished, the hull is coated with a thick layer of PVA.
Upon starting to work with the glue, I add a small 'handle' to the bottom of the ship for something to hold on without looking like a slime monster at the end of the day. You can use a scrap balsa piece and glue a piece of paper on it, in a 'T' shape, to prevent the ship from tipping over.


Fig 6. We sand the whole business again, watching out for the areas marked on the pic above. This is where the grain would still show.
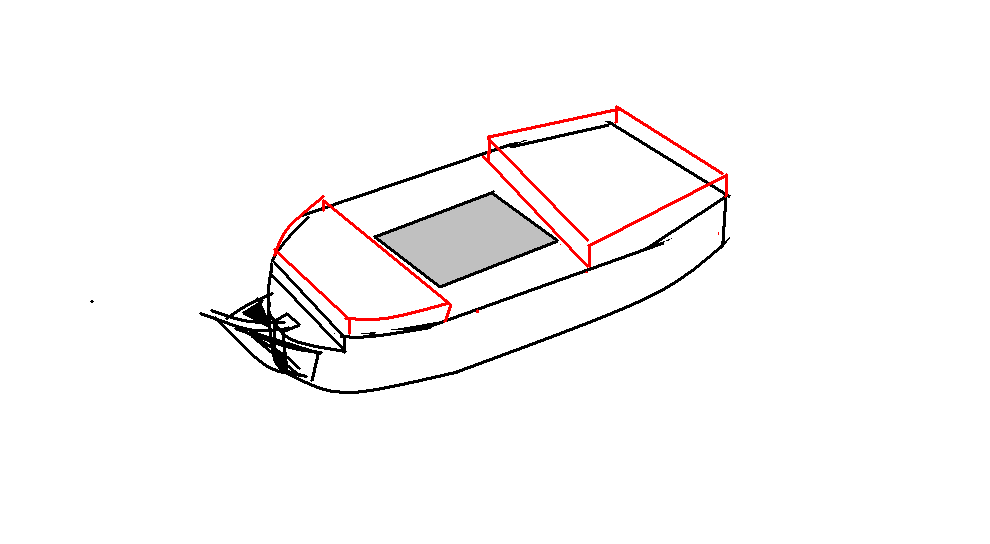
Fig 7. Our ship starts to actually look like one. For raised decks, I use 2mm plasticard. I simply lay the hull down on the card and mark its edges. This leaves enough excess to file off when trying to fit it on the hull!
After the glue we used to fix the raised decks bonds, comes another sanding, another layer of PVA.
Then the stem piece is added: mine is a sanded, small piece of plasticard. It's handy to have a little square/spare plasticard on hand and cut like illustrated below:

The easiest way to do this is scoring the surface with the knife, the excess can be snapped of by grabbing it with a sprue cutter or similar tool and just twisting the thing. The criss-crossed area is sanded for topper looks, on both sides.
Two blobs of green stuff are added to both sides of the plasticard piece when it is fixed firmly on the hull. It takes a little practice to shape it, but it cures slowly enough to experiment. I have no good recipe for this, you must try (Yoda didn't built many model ships, enough said).

Fig 8.5. We are super close now, only a few decorative elements remain. To tie the 'walls' of the hull in with the bow, we use a small piece of ordinary paper, red in the image above. A piece of thread (brown) is glued on, close to the water line, and curving upwards on both ends. A simple but handsome addition. It is also useful to aid in positioning the gunports, which come in the next step. The side gallery can either be painted on later or sculpted, in a simple form, from a small piece of GS, like on this frigate. The gun ports are thin card pieces, and a larger piece of card can also be added to the stern.
When all of this is done, comes the surprise in the form of more PVA. Worry not, this is the last layer.
Fitting the masts and sails on is child's play now. You can build so many types of rigging I wouldn't bother with telling about them all. A useful approach is to make a sail plan on paper, cut the sails out, lay them on a flat surface and apply them to the mast in one go.
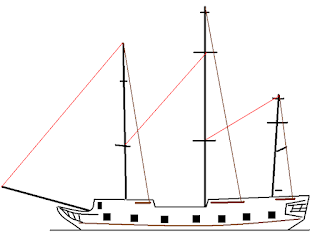
It would be too much of a hassle to paint the ship after the rigging is done, and my version is simplified compared to the multiple miles of rope hanging about on a real ship. So a little final advice: add the rigging after everything is painted; begin with the ropes marked in red, and don't do it mast by mast. I use little pieces of match sticks to fix the rest on the hull: I tie one end to the match stick then glue it on. Match sticks are uniform size, so you don't have to bother with cutting them up, which is a disadvantage of both the 'mast' pieces or balsa wood. As most warships are square-rigged and three-mast, the image above applies to a great amount of them.
You can see my results here. I know I'm a little late with this post, but first I ran out of GS then glue, while thinking I could make a tutorial with photos.
When all of this is done, comes the surprise in the form of more PVA. Worry not, this is the last layer.

Fitting the masts and sails on is child's play now. You can build so many types of rigging I wouldn't bother with telling about them all. A useful approach is to make a sail plan on paper, cut the sails out, lay them on a flat surface and apply them to the mast in one go.
It would be too much of a hassle to paint the ship after the rigging is done, and my version is simplified compared to the multiple miles of rope hanging about on a real ship. So a little final advice: add the rigging after everything is painted; begin with the ropes marked in red, and don't do it mast by mast. I use little pieces of match sticks to fix the rest on the hull: I tie one end to the match stick then glue it on. Match sticks are uniform size, so you don't have to bother with cutting them up, which is a disadvantage of both the 'mast' pieces or balsa wood. As most warships are square-rigged and three-mast, the image above applies to a great amount of them.
You can see my results here. I know I'm a little late with this post, but first I ran out of GS then glue, while thinking I could make a tutorial with photos.
What a beautifully illustrated tutorial.
ReplyDeleteI wouldn't call it beautiful, practical, maybe! Glad you liked it!
Delete